
his comment:
so.. can you provide me the link on the resin WIP for the waist?.. is it possible for using epoxy putty for the waist?.. now the impulse got the Nu's arm.. haha.. oh ya.. one more thing.. what tool you use to make those like screw hole on the base for that core splendor?.. can you show me in picture?.. thanks
so, explanation for what i did to the waist
 a look on the modded waist
 a look on OOB waist, courtesy of my NG 1/100 Sword Impulse Gundam
now, a comparison
 yellow line is arm at waist level
red line is end of fist level
green line is knee tip level
the mod gave a significant increase to the height, as you may see from the marked level
for OOB unmodded- the elbow joint is at the same level with the waist, and there is a short gap between the fist tip and knee tip
while on the modded waist, major differences can be seem :D
 a quick comparison shot on the bare torso. the left on looks longer
 the modded parts. the lower white part (grey on 1/60 due to surfacer) and the upper red part (black on 1/100)
for the red part, i put 3 pieces of 1mm pla plates into the cavity, giving an increase of 3mm. and yes, i removed all pegs and connectors that provide the OOB assembly
 for the lower torso, i added 3mm on the upper part and 2 mm on the lower part. i also extended the waist peg by 2mm
 while on the back, due to the shape on the upper part which is at a weird slanting angle, i had to use different material. firstly, extension with pla plate which DOES NOT include the blue highlighted part. that part, is extended using epoxy putty (i use Bondite Epoxy putty)
 view from the side. actually i did use some putty as the pla plate doesnt cover up some gaps at the behind, so i used putty to fill it up
that's for the lower part, now the red part
 for this part, i need to extend the lower part to cover a gap from the extension. using pla plate or putty directly can be tedious, so i firstly constructed a casing from pla plate. i used 0.3mm pla plate for this. and you can see the 3mm increase on the red part
 a view on the side. the red line shows the side of the casing, from pla plate. with the casing built, it is a simple matter of putting putty in it, and sand it down. blue part is the epoxy putty, filling in the pla plate casing
 front view, of the extended part, using putty
 now, what i mean with "good practice to work on resin kit eh? pinning using some brass rod i have ^^" is that the way on how i connect the two modded pieces. i mentioned earlier that i removed all connectors and pegs, so i firstly thought of gluing it together, but i wanted some ease in painting, so i use pinning method. brass pins/metal pins are used to create pegs to attach them together, but still need some gluing in final assembly. and that's some extra holes, yes, it took some giga-drilling to get it all right ^^;;;
example of resin pinning, credits to Lee3000 and his awesome 1/72 Hyper Zeta WIP
 sorta work like that, resin pinning.
and next, the base of core splendor.
 for those screw holes, i use mini drill bit and pinvise. the exact construction is :-
-base plate using 1.2mm pla plate
-top part, the segmented with panel lines is 0.5mm pla plates, all cut to different sections
-screw holes using drills
-vents and grey round bolts using Koto MSG
 the Kotobukiya MSG that i used for the base.
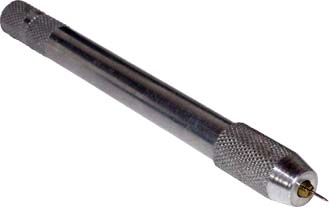
pin vise,can get some from MGS2U along with various sizes of drill bits
now, as a result from the mod
 you can see that there is no more space to insert the nose of the core splendor. although this is a loss to Impulse transformation, but then, for what reason do i need that? LOL
i prefer nice proportion over transformation XD and for that remaining cavity, it will serve as battery slot for LED in the head
now, onto the actual WIP
 testing on doing some armor cutting. since this is a Test type Impulse, so some cut off armors look pretty relevant IMO
 finally glued the small wing/shoulder binder to the shoulder armor
and for the backpack
 some sawing and plating, "some", yeaa, and i have RX-78 ish backpack!
 test fit. better than the elongated original backpack. however, one side is uneven, so might use some epoxy putty to level it up. and i has yet to put on the thrusters, as well as add on some more stuff to the backpack =D
so, as you may notice it, the sabers are back to the backpack
 so i put some missile pods into the arm armor. what do you think? (missile pods are extra parts from my Takara Tomy Blade Liger btw)
 *PEW* *PEW* *PEW* *PEW* *PEW* *PEW* *PEW* *PEW* *PEW* *PEW*
that's all!
.
A test type...Hmmm...
ReplyDeleteI RIKE !
Looking good, and very nice explanation for the pins, epoxy, and pla-plates. :D
ReplyDeletei got it.. thanks man.. now i know which tool i should get.. haha
ReplyDelete@Evaritus me rike too :D
ReplyDelete@Tom thanks!
@Seven glad to know that ^^