Thursday, April 15, 2010

HGUC RX-78-2 Custom WIP 3

RED


more updates~
note : the first 4 pictures are taken using Nikon coolpix 5700 which i dont know on how to adjust the setting making me to snapped some pictures with weird discoloration -__-

okay among the part that i had painted..the bazooka got kinda good layer of white paint while the shield....i'll explain after this...

the red on the shield turned out to be glossy/shiny and compared it with the original red plastic....actually when painting it i made a dumb mistake which is i painted red first.....the best is to use white first..but what i did are= first 2 coat=red, white coat then finishing red coat....4 coats.....that make the paint to be too thick until it become glossy...plus the details on the shield kinda almost 'depleted'

however, the red pigment of the paint turned out to be something fun~

first i thought that i'll make a red beam stick..so i just give one thin lazy coat of red and guess what?i got pink~! actually it almost red but then i give it some wet sanding and got pink~ like it~

comparing the pink with the shield..but the lighting may give different effects it seems ^^;;

different from the white spray, the red seems to be something fun~!

so..

i decide to paint the feet, head crest and the chin~

since its already red, so i gave only a light coat of red to prevent it from being glossy and what i got? gritty surface~! yaaiiyy~no need to use basic putty+ thinner + brush stroke technique~

the red crest and the chin turned out to be nice with a bit gritty~ the only reason why i repaint the red is that for RX-78 G30, the color scheme seems to be lighter so i want a darker red (but didnt paint the lower torso also since i want it to be balanced with the light blue of upper torso =D)

and yes, one bonus stuff ^^

that open palm is from my TTHL Exia TA and i changed the angle of the fingers (and yes, i mod this palm after making the katana)
why after making the katana? since this palm is included in my may-be-neglected musha project...

still didnt get it?

there you go. i mod the finger so that it can hold a scabbard (in this case proto-scabbard) and yeah, do note that i wont use the katana for RX-78 ^^

shin musha lolololol but not for this kit okay =)


so for the overall look so far..

the cannon still looking bare and need more detailing...notice how glossy the shield? too reflective lol

back shot. full armaments haha

just randomly shot this pose...since i 'played' with it too much so some painted parts (gold and silver) need re-touch up (maybe before topcoating ^^)

well, that for now ^^

.

Sunday, April 11, 2010

HGUC RX-78-2 Custom WIP 2

OMG i touched that putty again


continuing with my work on G30

instead of cementing the shoulder, i make panel-lines at the seams to balance it with the rest of the panel-lines...and had to scratch the opposite side of the seams so that can make better panel-lines


and yes, the seam-removal for the arm kinda successful although loses some details due to sanding the cemented parts =_=


also painted the V at the crotch gold like what rndm did

good thing they make the front skirt armor to be already separated ^^

and going down further...

the pure challenge....how im gonna sand those while not causing damage to the details O_O;;;;

so what i did is i sanded the part that i could and slice the oozed plastic off with knife...pretty hard job @_@


and turned out kinda good..and details-loses is quite minimal

and yeah, now it is in one piece now..the real culprit who dragged me into Gunpla world (note: when i was 8 i saw FG RX-78 and thinks on buying it but dad never bought it...so technically this guy got me hooked to gunplas ^^;;;)


and moving to the shield...

i restore this stuff again.....only will use it for filling hollow parts...and for gaps i'll use bacis putty (wonder if putty will be effective against Yukari?)

and for extension or whatsoever i'll get tamiya's epoxy putty..more reliable me think..

first got the upper side 'sealed' so that can make the putty to be compressed enough ^^

so filling the putty from the inside, they went through very smooth~

and yes, note which are good puttying and bad puttying ^^;;and i just filled the vertical hollow only for fun...no point doing that ^^;;

and for the back-cannon..


yes i use ballpen....but will only make the base so far..that red is taken from my lil bro's broken toys and fitted a plastic rod in it...and also fitted a PC into the pen....and that the part i feared the most for mis-aligning....>.<>.<

need to find multicharger then...

.

Friday, April 9, 2010

HGUC RX-78-2 Custom WIP 1

Here it comes ~


yep, gonna work on this now ^^

before going on with the WIP, i shall make my reference in making mods

-Seamlines?
-yep, gonna try to remove all (if cant some) seam lines of this kit

-Joint Mods?
- >_> i wont make any joint mod for this kit since got no suitable tools and no suitable materials despite me seeing too many potentials for joint mods (not to forget that almost cut a peg or two to trigger joint mod procedure lolololololol)

-Painting/Colors?
-nope, no painting/changing color scheme for this guy..this is my first RX-78 so i like it being like this ^^ and will only repaint the shield since will have putty job on the shield (scroll down ^^) and might paint the bazooka

-Re-designing?
- will redesign the cross on the shield..umm..why? *scratch head* well, better say religious issue (but please dont think the bad on us, Muslims) if you wanna explanation i'll explain it ^^

-Add-ons?
-Gonna add a cannon on the backpack, making it to looks like RX-78 for ground battle (note : read Gundam The Origin then you'll know) in first battle on Earth (in Origin manga) Amuro uses a backpack with cannon to crush Garma's squad
but i wont make it to be exactly as the manga's design..gonna make my own design

-will also try to make alternative rack for beam saber since the cannon will be mounted via the left slot for the beam saber so need to relocate the saber's hilt..maybe will put it at the back of the shield like RX-78 Ver Ka ^^

-Thrusters?
-THEY MUST BE SHINY *_*

-Top Coat?
-will topcoat it ^^ since during seams-removing procedure the surface of plastic might have different shades so topcoating it with flat coat will make them to look equal ^^

so for conclusion this will be almost a straight-build with add-ons ^^

to the WIP now

how i redesign the cross..im making it to look like SEED's typical shield.made the 'arms' of the cross to be as tsurupettan flat as the red part. how i got it into such result? answer=crazy sanding XD
see the hollow/gap? gonna deal with it using the only stuff i got in my room with Biohazard warning.....the epoxy putty ^^;;;

and also made some try-outs on removing seams


look~! no seams!! and no white discoloration is produced due to cementing and sanding process ^^

also paint the ammo of the bazooka ^^

and yeah, some parts do got me annoyed

first

those spikes are PITA to get their nubs to be cleaned..maybe they should mold it together with the main body (im agreeing with you rndm!)

maybe since i use marker with kinda large tips but those side and face vents are kinda hard to get them painted nicely >_>;;; also painted the vulcans gold

yes.....one shall never neglect pistons~!!will scrap off the excess paint ^^

well, i DID say i want shiny thrusters~ so this is not to be excluded also =D

and yeah, Marzz asked me before on how i painted these thrusters..dunno whether my own method will be useful since i use markers not paint ^^;;;; hopefully useful ^^

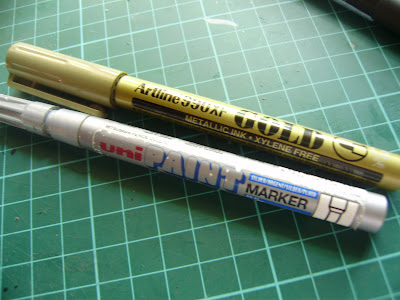
markers that i use..the silver is kinda okay but the gold is a bit annoying since it need looooooooong time to be completely dry and need to be touched-up every time you touched the gold

first i'll get the inner part of the thruster painted while it is still on the runner (in fact im used to make panel-lines when the parts still on the runners ^^ thats my second step in building Gunpla after cracking the box ^^) actually can still paint the gold when the thrusters are attached to their positions ^^;;;

then, got the thrusters off the runners and paint the base near the peg half only
so that no damage to the paint is obtained when attaching the thrusters

then attach the thruster and color the silver thoroughly. actually can paint the gold for the inner during this step ^^


look at that~ shiny lolz~!! me like~!!!


thats all to be wrapped up in this WIP.actually wanna tell more but my camera's battery died >_<;;;;; .

.

Wednesday, April 7, 2010

SD UC Preview

THIS IS SPARTAA NINJA!!!!

some sort of it ^^;;;

well after i got it, i got all the pieces to be snapped off from the runners, painted some of them and assembled some parts (to prevent the paint from scrapping off and to test my seam-removing skills but fails ^^;;)

so after my interview yesterday,i decided that i'll have the WIP to get on my highlights on this kit but since this is a SD.....so......i got it assembled pretty fast ^^;;


and yes, the UC in SD format (and in UC mode) what can i say? the best will be 'Half-transformed'


i do really like how good the engineering they put on this kit..almost same with the MG version, the transformable parts manage to conceal the Psycho Frame pretty well
and, in UC mode, when adjusting the shoulder ball-joint, the armor will purge easily and reveals the PF (almost like in old UC's PV ^^)

ok now for the highlights ^^

got the PF on the leg painted with permanent red marker but i use the one with quite large tip so turns out to be a bit messy...need further clean-up. and the right leg still unpainted...i'm planning to get marker with finer tip for that ^^ notice also i still didnt put the gray sticker on the feet

and the PF on the arm turns out to be better than the leg.i also tried painting the palm but turned out to be not really good with rough and uneven coats..but still okay for me

one interesting feature i discovered thanks to the implementing of Beast Mode in this SD

somehow, it looks like can put a Banagher inside this XD..yes, the movable panel makes it to look like a cockpit hatch ^^

instead of using the gold shiny bling bling sticker, i chose to painted the yellow on the V-fin. the paint tends to scratched off easily since im using Artline yellow marker..but can touch up the scratched portion ^^

and yes...

WHY BANDAI WHY!??????????
YOU GAVE CLEAR PF FOR SD AT THE BACK AND MAKES ME TO PAINT IT FOR THE HGUC!!???

WHY!?????????


and some parts that i painted..the blades for the shield (still got 1 more to go) the hilt of the saber (but makes it too tight to be inserted into the palm so im gonna scratch it a bit) and yes, gold thrusters ^^


and some pictures of the SD UC DM


definitely looks better in DM ^^ IMO but some transformed parts are held up with pretty 'unreliable' attachements (like the crotch and back skirt armor) so there are chances of them getting loose


big guy and mini-me ^^ sure OO will get pwned again next >D

gonna give it some touch up and will give it outdoor photo shoot since it has the PF~~

next will start on RX-78-2 for the Group Build ^^

.

Friday, April 2, 2010

GuaiZD WIP 4 + something~

ALL THAT RX


note : the WIP got nothing to do with the title XD

some progress on GuaiZD (okay mafty, you won this time on ZD series =_=")

made panel lines on the backpack and filled the mis-scribed with tamiya basic putty (can see the filled line in the pic ^^;;)

still figuring on the waist, so i tried on checking for any possible mod for the elbow

O_O;;; the space after removed unwanted plastic is too small for any PC to fits in....need to get some Koto's option joints =_="

felt a bit bored so...

got the backpack cut into three parts...

and while figuring on anything i can do with the backpack (movable side parts etc etc)
i came up with this...

Musha GuaiZD lolz~

haha but i wont make it like this ^^;; the katana is a scratch built previously..

so, after brainstorming for a while...

i think that i'll make a backpack with movable side thruster =D
so.....


manage to fixed a PC there after some hard work (almost break a part ugguu..)

when i came up until this 'stage', i decided that i'll take a break for a while and...

took the keys and off to Gusto~!

went there to pick up my HGUC RX-78 G30 that i ordered earlier and also...

SD UC GET~!! now i got all RXs that i want~!!
SD UC is one of kits that i wanted while RX-78 is in my must-get list and for RockLeeLotus Group Build ^^

first impression is that UC's box is bigger than RX-78 lolz
O.o


but when the boxes are cracked open...UC's box is larger due to the size of the A runner...so Granddaddy still win~ XD

one shall love these psycho frames~
UC : YESS~!!!
OO : *facepalms* Oh no....crap...


and for granddaddy, still beamless so they give you WHITE STICK!!!! >_>;;;

thats all for now ^^

need to make preparations for the JPA interview for overseas scholarship, wish me luck okay ^^

maybe will build UC first lolz

and yeah..

Backlogs : MUAHAHHAHAHAHA!!! FINALLY!!!

.