and here i am again, back at home for summer break, as well as back to gunpla. this isn't actually the first one i had for the break, as i actually went ahead and finish up my Hi-Nu Gundoom, which i will post up the remaining WIPs and get it topcoated for the full gallery (dammit weather stop raining and gimme sunlight already!)
anyway, this is one of the most highly anticipated kit, ever since Gundam UC EP4 was released, and yea, he's freaking badass and granted with the unique design, i am sold for a box of it ^^
lovely lovely lovely boxart, capturing its crowning moment of glorious awesomeness from the episode
took me a while to get it all built, with my tools all rusted and stiff, and so do myself. after some on and off session, got it all put together.
quite unique and still proportionate i'd say. the build itself is interesting, especially with the arms where you simply layer up parts onto layers of parts
to be frank, after UC 4, i am not all that into Byarlant Custom, mainly due to that triangular ass thruster, which i find to be aesthetically ridiculous. but nyeh, the design grew one me bits by bits. the backpack can gets into having stuff bumping around, but it is articulated enough to get out of the way
not planning anything fancy on this one, other than just some detail up and a lil tweak to the color scheme. and yeah i do have the water slide decals coming from Samuel Decal, the provided stickers for the shoulder EFF logo is just.......Eff
and so to begin with the mods
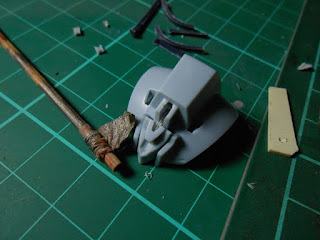
cut out the excess plastic at the nozzle of the barrel of the cannon, a more realistic and practical looking, and still fits the beam saber with no problem. on the lower grip claw, i gave the peg a scribe to mimic screw heads
simple cut to manage for seam line removal. the part that wraps the elbow polycap will be later covered with more parts, securing it in place. speaking of the seam lines, some of the are best to be turned into panel lines i'd say rather than standard cement works
as for the shoulder, that indent is a bit suspicious, and here comes your plastic surgeon XD
more panel lines scribing on the backpack flat thrusters. as for all these, pla plate will be added afterwards
and for one more shot for fun
LED mod :D
now, how did i get that?
drilled some holes to fit the LED legs on the yellow base, and i removed (read: destroyed) the central peg hole on the main head part to make more room for the LED
could use smaller drills, but here goes a 1mm hole right on the 'eye' part of the face mask. EXTREMELY CAUTIOUS AND PRECISE DRILLING needed. don't blame me if you screw up >.>
and also open more holes on the head, direction to the visor. this will allow the light from the LED in the head to make its way to the clear visor
and to assist with this lighting, i do have optic cables, but i happen to fin this random thing lying on the floor
and it does the job all the same and all the good :D
so through the 1mm hole, i got like 5 pieces of the optic cable from the face plate to the inside of the head. the earlier picture had the cable straight from the face to the light source from my phone, making the lighting to look good. this one had its light not that powerful, but the basic idea is here. will further refine this, as well as figuring out the wiring and the power source as well
that's all, till next post ^^


I see... So THAT'S how you do the head lighting mod... Pretty interesting.
ReplyDeleteBut the one that caught me most is... the shoulder mod.
Will do that with mine.
it's pretty easy to do right with the shoulder given the way on how the indent is there, looking forward to yours :D
DeleteOptic cables... From them lighting flowers!
ReplyDeletego get them! quick!!
DeleteWait, so those cable does the trick.
ReplyDeleteOHMAI.
yeap :D nifty ain't them? ;)
DeleteSo it's summer where you live and winter where I live. Kinda got a brain freeze there. Can't wait to see what you'll do with this.
ReplyDeletetechnically summer at where i studied, aussie being at the lower atmosphere. i go back home in Malaysia escaping the summer heat so yea. have yet to experience winter at northern part, aussie's winter ain't that par with yours haha
Deletebirkin bag
ReplyDeletelebron 17 shoes
off white shoes
hermes online
golden goose
supreme clothing
balenciaga
yeezy 350
balenciaga
nike x off white
Full Report gucci replica bags more information luxury replica bags reference best replica bags
ReplyDelete